Getting Started with Semantic Search
This page guides you through creating and querying your first semantic search view.
Prerequisites
- A Macrometa account with sufficient permissions to create search views.
- Create a document collection called
employees.
1. Add Data to Collection
To begin, you will insert data with vectors into the employees collection. For more information about using C8QL, refer to Queries.
Click Compute > Query Workers (if you are not already in that section).
Click New Query.
Copy and paste the following C8QL query into the query editor on the Editor tab.
LET data = [
{"_key": "100", "address": "london", "name": "charles", "vector_address": [60,70,80], "vector_name": [30,40,50,60]},
{"_key": "101", "address": "kolkata", "name": "saurav", "vector_address": [600,700,800], "vector_name": [300,400,500,600]},
{"_key": "102", "address": "bengaluru", "name": "rahul", "vector_address": [100,200,100], "vector_name": [100,200,150,250]},
{"_key": "103", "address": "delhi", "name": "virat", "vector_address": [200,300,100], "vector_name": [500,600,550,750]},
{"_key": "104", "address": "mumbai", "name": "sachin", "vector_address": [60,70,80], "vector_name": [300,400,50,60]},
{"_key": "105", "address": "detroit", "name": "jennifer", "vector_address": [60,70,80], "vector_name": [300,400,50,60]}
  ]

FOR d IN data
    INSERT d INTO employees
Click Run Query.
Six records with vector information are now present in the collection, so now you can create a search view to index them.
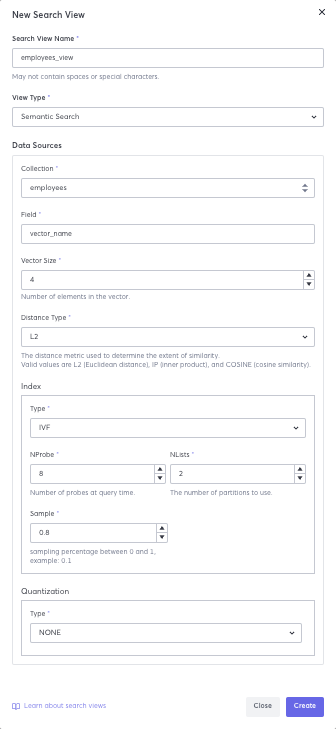
2. Create a Semantic Search View
You are going to create a semantic search view on the data you entered in the document collection. For an explanation of how search views function, refer to the Semantic Search Tasks section.
These values for this search view are specific to this data set, because it is very small. Different data and use cases might need different search view settings.
- Log in to your Macrometa account.
- Click Data > Search Views.
- Click New View.
- In the Search View Name field, enter
employees_view. - In View Type, select Semantic Search.
- In the Collection list, select employees.
- In the Field field, enter
vector_name. - In the Vector Size field, enter 4, which is number of vectors in the field.
- In the Distance Typefield , enter L2.
- In the Index section, select a Type of IVF.
- In the NProbe field, enter
8. - In the NLists field, enter
2. - In the Sample field, enter
0.8. - Do not enter anything in the Quantization field. Click Create.
Your vectors are indexed in the search view and ready to query. Macrometa distributes this search view to every location in the global fabrics. If you're curious about the locations, click Dashboard to see the default fabric locations.
3. Query the Search View for Similar
To query the search view, you can create a query in Macrometa to run it as needed or save it as a query worker.
On the side menu, click Compute > Query Workers.
If the code editor is not empty, then click New Query.
The code block below is a search query that will allow you to pass in a query parameter to search the search view. Copy and paste it in the code editor.
RETURN SIMILAR("employees_view", [30, 60, 60, 20])Click Run Query. Macrometa displays query results below the row of buttons.
(Optional) Click Query Info in the Query Result to see what the query did and how long each step took. Pretty cool if you're into performance metrics.
The query you ran returns records with similar vectors to the vector that you queried, along with a score indicating how similar they are. Because record 100 has an identical vector, it has a score of 1, indicating 100% match. You can change the vector numbers and rerun the query to get different results.
[
    [
        {
            "id": "100",
            "score": 1
        },
        {
            "id": "102",
            "score": 0.935016393661499
        },
...
]
4. (Optional) Save the Query as an API Endpoint
When you save a query worker, you can access it via REST API from anywhere in the world in under 50ms.
- Click Save Query.
- Name the query similarSearch and then click Save. This saves the query so you can use it again.
- Click Run Query.
- Click API Endpoint.
This query requires a value to be passed with each request, so you must enter one in the bind parameters or else the query will fail with an error.
